Crop-A-Dile II Big Bite vs. Making Memories Instant Setter
Hello, well I am still in bed but I managed to bribe my son into bringing me a box of my scrapbooking supplies in here so that I can do SOMETHING! I was so disappointed with one of my new tools and so thrilled with another, that I decided to write about it because the reviews are so drastically different at every store’s website and my take on them were different from the majority of other reviewers.
As you may know, I’m kind of a newbie compared to most when it comes to scrapbooking, so I’ve never used the hammer for setting eyelets or punching holes, etc. After searching for tools and reading reviews, I decided to buy the Making Memories Instant Setter. The reviews at Joann.com were all five stars and after watching the Making Memories tutorial/video on YouTube, I thought I’d found the perfect tool. Read on to see if I was right!
- Making Memories Instant Setter Product Review
- We R Memory Keepers Crop-A-Dile II Big Bite Punch Product Review
- How to Use the Crop-A-Dile II Big Bite – Block Settings
- Crop-A-Dile II Big Bite – Video Tutorial
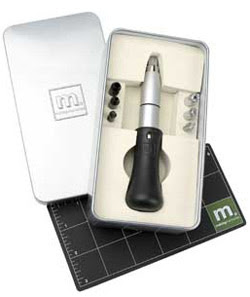
 Making Memories Instant Setter
Product information:
- Spring loaded with tension control for easy hole punching and eyelet setting
- Includes 4 setting tips, 3 punching tips and setting mat
- Magnetic head for easy tip changes
- Works with our Slot Punch Tool for paper or ribbon weaving and corner slot punching
- Adjustable handle creates tension control
Price at Joann.com – $14.99 + shipping (what I paid)
I grabbed my eyelets and my instant setter, some paper, read the instructions and I was ready to go! I used a piece of cardstock and a 3/16 eyelet. First I used it to punch a hole, a little hard to push (remember I have CFS so I’m not as strong as some of you), and very loud but it punched a hole. Next I put my eyelet through the whole in the paper (following the instructional video on Youtube), put the correct tip into the setter and pushed down (hard). I lifted it up and…NOTHING! lol It didn’t flatten, nothing happened, so I did it again, and then again. Still, Nothing! I increased the pressure (several times) and finally ended up with it on the strongest setting which required me to lean over the thing to push down hard enough on it to get it to make the “clicking pop” sound and guess what? It worked, sort of. It was pressed about 1/8 of the way down. So I did it over and over (approximately 7-9 times) and finally it was flat. Besides the fact that I was physically worn out and in pain by then, the eyelet was messy on the back (not very flat), and the paint peeled off starting on the inside of the hole on my eyelet. I was bummed!
I decided to try it again, same result. I did it over and over until I’d gone through at least 2 dozen eyelets on different settings before I gave up in disgust. Of course it’s too late to return it now so it is sitting back in it’s cute little tin box and will remain there until I can figure out what to do with it. I want to get my money back but I feel guilty trying to sell something that in my opinion, is a waste of money.
So, I began a new search and decided to give the Crop-A-Dile II Big Bite a try. The reason I didn’t buy the smaller and more convenient Crop-A-Dile is because you can’t reach in the middle of a 12×12 piece of paper to punch an eyelet. 
We R Memory Keepers Crop-A-Dile II Big Bite Punch
Product Information:
Big Bite Crop-A-Dile II is an all-in-one tool for punching, setting, and snapping. It’s ideal for eyelets and grommets. Can punch through paper, leather, fabric, plastic, thin tin, chipboard, and much more! Easily sets grommets with a 1/3″ center. Features a 6″ punching reach that allows you to punch and set the accents at the center of your 12″ x 12″ pages. Rotating setting blocks and action setter help you do what you want to do without fumbling around for loose pieces. Also features two removable feet and an adjustable measuring guide. Made of steel, plastic, and silicone. Size: 12.25″L x 2.75″W x 11″H. Silent and easy to use. Made in China.
- Easily sets grommets with a 1/3″ center
- 6″ punching reach that allows you to punch and set the accents at the center of your 12″ x 12″ pages
- Size: 12.25″L x 2.75″W x 11″H
- Silent and easy to use
Price at Joann.com $23.99 + shipping (what I paid)
At this point, I wasn’t expecting much since I was so disappointed by my last “find”. It was pretty big which worried me and there were virtually no instructions so it wasn’t looking good. Then I tried it – I used the same cardstock and eyelets so I would have a fair comparison.
First I used it to punch a 3/16 size hole for my eyelet. Smooth, easy squeeze, no noise and I’m getting a little happier. Then I take my eyelet, put it through the hole, change the setting on my Big Bite (You just slide the little orange tab on the top of the tool “function selector” forward from the hole punch setting to the setting function), put the paper in, line up my eyelet, squeeze and VOILA! A PERFECTLY SET EYELET!
I was so happy I squealed! lol No noise, no pressure, it was so easy and came out perfectly! I love this tool. I just want to go around setting eyelets into everything now!
*UPDATED 1/14/2013 – You can now watch video tutorials on how to use this tool here:
Crop-A-Dile Big Bite Tutorial
What I don’t understand is that at Joann.com, the reviews for the the Making Memories Instant Setter is five stars. Everyone loved it. Over at Scrapbook.com it got 4 out of 5 stars. Why don’t I love it???
Reviews for the Crop-A-Dile II Big Bite at Joann.com included the following titles:
Negative Reviews:
- “UGGGGH!”
- “Just had to have it, unfortunately…”
- “very disappointed”, etc.
- “Great idea . . . Just doesn’t work!”
- “Not impressed”
- “Don’t bother”
10 out of 16 reviewers would purchase the product again so the majority of the buyers do like it but I still don’t understand the negative reviews. I checked the reviews at Scrapbook.com as well; and out of 50 reviews, the Crop-A-Dile II Big Bite gets 4 1/2 out of 5 stars.
I think that something many companies overlook are the importance of good “step-by-step” visual instructions. With better instructions, I believe the Crop-A-Dile would definitely have gotten better reviews which = more sales.
How to Use the Crop-A-Dile II Big Bite – Block Settings
Since the instructions pretty much don’t exist, here is a tip that may help you if you find that you are smashing your eyelets:
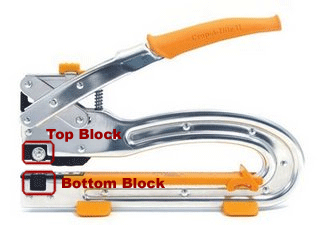
There are two “blocks” on the tool, the top block and the bottom block. (see image that I so eloquently created LOL)
Each block rotates and has four different sides with different surfaces/shapes. There is a chart included in the bottom of the packaging that shows the different combinations you can use, depending on the type and size of your eyelet, snaps, embellishment or gromlet. You need to make sure you set the blocks in the correct combination for your project. For example, for a regular, non-decorative circle 1/8″ eyelet, the top block should be set at “C” and the bottom block should be set at “3”. Because the surface of each side of the blocks is different, if one doesn’t work for you, try another. Some people use the setting “C” and “4” instead because “4” is flatter than “3” but I’ve never had to do that.
BLOCK SETTINGS CHART:
The following is a text version of the block settings chart:
TOP BLOCK
For top (decorative) side of eyelet or embellishment
- A = 3/16″ (Large & Extra Large) Eyelet Setter
- B = Flat Top for Misc. Use or Flat Embellishments
- C = 1/8″ (Small) Eyelet Setter
For bottom(back) side of Gromlet
- D = D 1/3″ (Large & Extra Large) Gromlet Flare
BOTTOM BLOCK
For bottom (back) side of eyelet or embellishment
- 1 = 3/16″ (Large & Extra Large) Eyelet & Snap Flare
- 2 = 5/32″ (Misc.) Eyelet & Snap Flare
- 3 = 1/8″ (Small) Eyelet & Snap Flare
For top (decorative) side of Gromlet
- 4 = 1/3″ (Large & Extra Large) Gromlet Setter
Below you can watch a video tutorial courtesy of Scrapbook.com:
So that’s my review of these two products for setting eyelets/gromlets. Do you have either of these? I’d love to hear what you think! Please leave me a comment and share your feedback with other readers.
Happy Scrappin’!


Hi, it’s a very great blog.
I could tell how much efforts you’ve taken on it!
Keep doing!
Well thank you very much 🙂 You just made my day!
I have this item and LOVE it! I can say that I’ve not had any negative thoughts about it at all! Would I buy it again? Well lets just say that I ahve 2 of the crop-a-dile and one of the big bite…if another really good deal on the price became available to me- I’d buy it!
I don't own a crop-a-dile. However I do own an eyelet setter from Fiskars. It comes in a package of three (all different sizes) & sells for about $17 at Joanns. Its spring loaded so it does not require you to exert a lot of pressure to get it to work but it is loud. 🙂