
This is my favorite category because I am a Crafting Tool addict! If there is a new tool out there, I MUST try it! Anything that makes crafting more fun or easier is something I want to try. Needless to say, I’ve tried a lot (a LOT) of crafting tools and these are the ones I use the most and recommend. *Warning, this post may be a little long because like I said, this is my favorite category and there are so many great tools out there that I recommend*
By the way, there are a lot of “tools” that will not be on this page but on others, such as stamping tools, organizational tools, ink blending tools, die cutting tools, etc. You will find those in their own categories in this blog series. If there is something you cannot find, just let me know. 🙂
If the product(s) are available online (usually where I purchased it), I will be list and link for you. I do link to products in my store and I use affiliate links when possible (at no cost to you), but none of the products I’m listed were provided or sponsored by anyone. (I stock my store with my favorite products!) These are simply my personal favorite products that I use when crafting. Full Disclosure Here.
Let’s start with the basics.
Label Maker – PTouch CUBE

I used to use the (PTouch label maker) that everyone else uses but I do a lot of labels at once and I hate punching it in by hand and the waste for the labels weven when using chain print so…..I recently switched over to the PTouch Cube.
The PTouch Cube uses the SAME labels that the basic (PTouch label maker) uses. The difference is that there is no waste, you can use different sizes (6mm, 12mm and 24mm), as well as the fact that you can use the software to type out the labels on your computer OR on your phone. I really like doing them on my laptop and i make less errors when typing them out. I will never go back to the basic one now that I have the cube!
Work Surfaces
Tim Holtz Glass Media Mat (Travel Size & Left Handed Mats Now Available)

I use the Tim Holtz Glass Mat as my main work surface. It’s made of glass, measures 14″ x 23″ and is non slip because it has “grippy” feet on the bottom. The mat is gridded so you can align your projects to get them straight or measure them, etc. There is 7.5″ x 11″ palette area that is covered with a non stick mat overlay. The non stick white craft mat surface is removable and they sell replacement mats as well for about $5.00.
Wendy Vecchi MAKE ART Stay-tion

Last year I started using the Wendy Vecchi MAKE ART Stay-tion which is magnetic and includes four round magnets to hold your paper/project still while you work on it. The reasons I like this is that it is large but not too large. It is 12 1/2 x 12 1/2. The entire surface is magnetic which keeps your paper/stencils from moving around while you ink, stamp, distress, whatever…. It has a grid and a magnetic ruler which helps you line things up perfectly (I’m not known for lining things up straight LOL) so this helps me a lot!.
I have to add though that while I have not yet had any problems with the products that I use on it (distress & dye inks, pastes, etc. (I clean it up right away), that it is not made for use with ALL products. These guidelines are from the manufacturers website.:
When using Permanent and Solvent Inks, Alcohol Ink, acrylic paint, stencil/texture pastes, as well as any medium that has a permanent quality on your project with the MAKE ART Stay-tion, it is recommended to always use a non-stick surface such as Ranger’s Non-Stick Craft Sheet underneath your project. The included magnets can secure it in place without causing damage to the grid surface. The gridlines are visible through the Non-Stick Craft Sheet.
Solvent-based and other harsh and/or rough cleaners will remove the grid lines and should never be used on the MAKE ART
Stay-tion surface. Recommended cleaning is with mild soap, water and a soft cloth.

You can buy extra or replacement magnets and it now comes in a Mini 7″ size as well!
Personally, I use this a lot now when stenciling, inking, watercoloring, etc.,, instead of taping my paper down to a cutting board like I used to.
Paper Trimmers
I have had the same favorite paper trimmers for YEARS and that has not changed. To this day, I have yet to find another that even compares to the two that I use.
Cutterpillar Pro

I use the Cutterpillar Pro Trimmer for any cutting that I need to do at my office, but most often I use it to cut chipboard. When I pack dies in a non sturdy envelope, I always include a piece of chipboard attached to the die(s) to keep the dies from getting bent in the mail.
In all the years I’ve been crafting, I’ve never used a trimmer better than the Cutterpillar(s). Whether you want a large one with a bigger footprint or a smaller one that can be more space friendly, you can’t go wrong with this brand. I got my first one when they were doing a Kickstarter program several years ago and although I have bought MANY trimmers since then, these are the ONLY two I’ve kept.
Anyway, some of the features I like about the Cutterpillar(s) is that the rotary blade NEVER has to be replaced. When they say that, they really mean it. I have put my trusty Cutterpillar Pro through the test of time and it’s still going as strong as day one! I like the LED lights which help you cut exactly where you want in all kinds of lighting. I also appreciate the fact that you can cut a 12″ sheet of paper with no trouble because the cutting surface is 15″ x 17″ and the ruler goes up to 17″. It also has a handy little storage tray on the bottom that I tend to forget about, but it’s a good feature if you want to keep something in there.
Cutterpillar Crop

This is the trimmer I use solely in my own craft room. Some of the things I specifically like about the Cutterpillar Crop is that it has the same sturdy construction and other features as the Pro plus:
- The smaller foot print (takes up less room) than the Pro. It has a base of 6.5″ but can still cut a 12″ sheet of paper with no problem. The ruler extends to 17″!
- It is lightweight and portable.
- Can cut through chipboard like butter and then something as light as vellum and the edges are always smooth and straight. You can cut a big piece or a teeny, tiny sliver with no worries.
Scoring Boards & Bone Folders
I use two Scoring Tools in my craft room. The WRMK Score Board for larger projects and the Scor-Buddy for card making.
WRMK Score Board

The WRMK Score Board has a 12 by 12 inch working area with score guides every 1/8 inch. It comes with a bone folder and score guide which both store in the bottom of the board. It has rubber feet to keep it from sliding. Here is a close up look at the increments for scoring. This is one of my favorite features:

Scor-Buddy Mini Score Board

The Scor-Buddy has been on my favorites list for many years now because it is my go to tool for scoring when making cards. It measures 9 x 7.5 and is the perfect size to be handy, yet do a great job. It comes with a bone folder/scoring tool which is stored at the top of the board but I use my teflon bone folder instead.
Kat Scrappiness Teflon Bone Folder

The reason I recommend this bone folder is because for one, I love the shape. It has a completely straight across bottom edge, which I prefer for running the folder over creased lines. It makes it much easier for me and I make less mistakes. The reason Teflon is important is because for one, inks and adhesives, etc., will not stick to it which will keep it looking and feeling brand new. It also does not leave that “shiny” look when you burnish the score lines. These are the top reasons that I recommend this bone folder.
Die Snips

These will be listed under Die Cutting Products as well but they are a tool so I’m listing them here under Crafting Tools as well. The Kat Scrappiness Die Snips were redesigned this year to make them stronger and a little bit thicker so they won’t break when snipping even at the tip of the snips.
One of the reasons these die snips have been rated and reviewed so highly are because of the design. They are completely flat on one side which allows you to get RIGHT UP to the edge of the and snip off the connector without leaving sharp pointy spikes that poke you when handling your dies. No more filing the pointy parts off either! If you’d like to see what some of the Kat Scrappiness customers are saying about these die snips, click here to read their reviews.
Embellishment Spoon

The Kat Scrappiness Embellishment spoon is great for scooping embossing powders, glitters, sequins, sprinkles, pearls, rhinestones, etc. I love that it is metal and sturdy and has a long handle. I also like the shape of the scoop/spoon and the affordable price.
Embellishment Trays & Funnels
This year Kat Scrappiness has added a few different embellishment trays & even one with a funnel to our product line. They are so useful and have been selling like hotcakes. Here are the ones I use the most:
Triangle Embellishment Tray

The Kat Scrappiness Triangle shaped Embellishment sorting tray measures approximately 3″. It is perfect for sorting through your small embellishment such as small die cuts, sequins, beads, clay sprinkles, jewels, and more! Once you have used the embellishments you need, our trays will pour your goodies right back into your storage containers. They come in four colors including, white, pink, light purple and pink for around $1.99 each. My friend Jennifer McGuire, uses this type of tray for pouring embossing powder on her stamped images, so it has multiple uses.
Funnel Tray by Kat Scrappiness

I use this funnel tray for EVERYTHING! From sequins to beads to sprinkles and pearls, even embossing powder and glitter! It’s so handy and very affordable! I especially like the screw on cap on the funnel and the size of this tool.
Embelli-tray the No Mess Crafting Funnel

This Embelli-tray (funnel/tray is great for larger projects. It measures 6.5″ long and 4.8″ wide and is .60″ tall. It is large enough to hold a lot of embellishments. The spout is small enough to pour your embellishments back into your storage container without spilling them. It’s very handy if you are working with a lot of embellishments or larger ones.
This color is called Dazzling Sky and it is only available at Kat Scrappiness.
Die Release Tool (Pokey Tool)

The die release tool by Honey Bee is one of my most used tools. It is very handy and I use it for all sorts of things, not just poking the paper out of dies. It has a little scoop end on one end and the pointy end on the other. I call it my “pokey tool” lol.
We R Memory Keepers 3 in One Weeding Tool

With the WRMK Weeding Tool you can remove, place, and clean intricate die cuts. The brush end is used to release the paper from your die cuts. There are levers that allow you to switch between the piercer (to lift and place small die cut pieces) and the scraper (to flatten bubbles and clean mats). This is a handy little tool to have!
T Square Ruler

T Square Ruler – which you an find here (or in your local craft store. This little tool has been on my list for many years. I use it on almost every card. It’s great for lining up stickers, sentiments or die cuts, etc. Everything can be straight with this inexpensive tool! Great for card making or scrapbooking.
Couture Creations Creative Detailer

This is the Couture Creations Creative Detailer. This little tool has a motor and comes with two sizes of refill erasers. It will remove foiling, marks, lead and colored pencil, etc. I’ve used it to remove small spots of ink when stamping as well. If you make a mistake, you can simply use this detailer to remove it! It’s handy and works really well and is great for getting into small, detailed areas of a project.
The reason I like this tool better than the other erasers on the market is because it’s so tiny and fits in the smallest of areas to clean up any little mistake you may have made on your project.
Mono Sand Eraser

For larger projects or mistakes, I use the Tombow Mono Sand Eraser. This little eraser is so very helpful when I make a mistake. It removes almost any mark from your paper including colored pencils, inks, pens and even some markers! If you just rub it gently over your paper it will remove the mark without leaving damage to your paper. It works great for mistakes in larger areas whereas the Couture Creations Creative Detaileris better for getting into smaller areas.
Tim Holtz Distress Sprayer

I have tried many different water bottles including the mini misters (which work great for small projects or traveling), but the one that gives me the best coverage and the fine spray that I prefer is the Tim Holtz Distress Sprayer. It always seems to give me full coverage over whatever my project is and the spray/splatters are perfect for making backgrounds with distress inks OR spraying your cardstock before using it with a 3d Embossing Folder (more on that later!). I highly recommend this spray bottle.
Ink Blending Tools
I am going to include my favorite Ink Blending Tools in a new category I added this year called “Ink Blending Tools & Accessories” in this “favorites” series. So please look there for my recommended ink blending tools.
Crafting Lights
Lighting is so important when you are crafting. I have two lights that I use that are FABULOUS and I need a lot of light because in the dreary Northwest! The first lamp I bought was a recommendation from the lady who does my nails, she uses it and so I bought it from Amazon for around 20$ (prices vary from time to time) and it has been FABULOUS!
Fugetek LED Desk Office Lamp
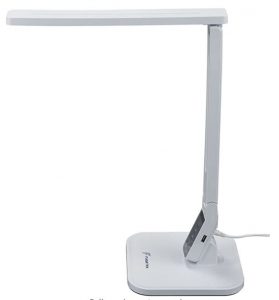
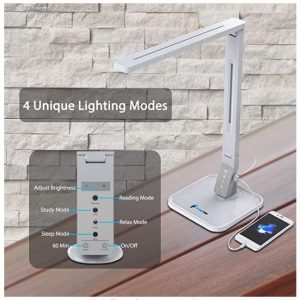
This lamp has a charging port for your phone, five brightness modes and four color modes. It’s great if you are coloring or doing something here you need up close lighting. I’ve had mine since November of 2019 and just love it.
Feit Electric 4′ Linkable LED Shop light
(This link works even if it’s crossed out) as of 1/21/21)
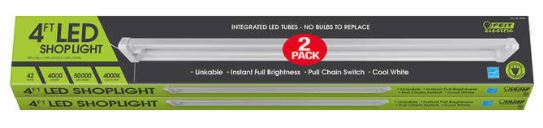
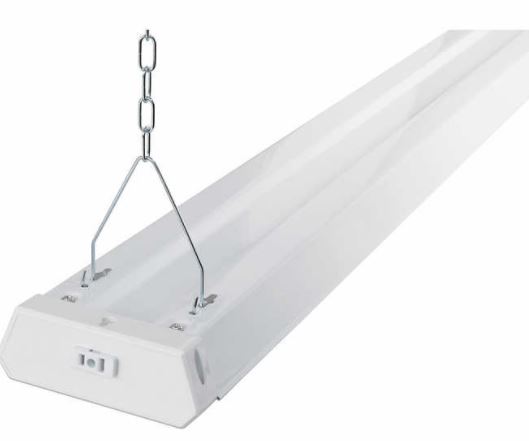

This 4″ LED light (the link works even if it looks crossed out) (The link I found is for a two pack, but I got it as a single light at Costco) is meant for workshops I think but I thought it would be perfect for over my desk and boy was I right! It puts out so much light that it’s amazing! And it’s clean bright white light, not yellow at all. Since I can’t explain the technical stuff, here is what the manufacturer says on the website about it:
This 4ft. Linkable LED Shop Light with chain includes integrated LED tubes and requires no lamps to replace. Perfect for hanging or flush mount installation. Ideal use in garages, basements, game rooms, utility rooms, workshops, cabinets, closets and attics. Easy plug-in fixture, no humming, ultra-light weight design. Includes 2 hanging chains with V-hooks, 2 screw hooks, 1 pull chain extension, 3 mounting screws, 3 wall anchors, 1 cable tie and installation manual. It can last for up to 50,000 hours or 46 years (based on normal household use of 3 hours per day).
- Instant On To Full Brightness
- Integrated LED Tubes
- No Bulbs to Replace
- Linkable
- Mercury Free
- Includes Hanging Chain
- Pull Chain Switch
- 4 Feet Long
- Fully Assembled
- Durable Design
- 5ft. Plug-In Cord
- Durable Smooth Edge Housing
- UL/CUL Listed
- Energy Star®
Specifications
- Brand: Feit Electric
- Feit Model # SHOP/840/LED/2
- Actual wattage: 42W
- Color Temp: 4000K
- Lumens: 4000
- Lumen Efficiency (LPW): 95
- Input Line Voltage: 120
- Dimensions: 48” L x 5.25” W x 1.95”H
- Life Hours: 50,000
* Life is based on 3 hrs/day
** Estimated Yearly Energy Cost is based on 3 hrs/day, 11¢/kWh. Cost depends on rate and use.
Suggestions:
Do you have a favorite product not listed here and you’d like for me to try it out? Contact me here with the information and I’ll do my best to get it and give it a try and if I LOVE it, I’ll consider adding it to this list!
I do hope this list helps you in your own creative endeavors and that you find some things you love! Happy Crafting!


The P Touch Cube…I was reading reviews about it on Amazon that said there is a ton of waste. How do you avoid the waste? I literally just bought a new label maker from BJs but may take it back if avoiding waste is an option.
There is VERY LITTLE waste. I don’t know who said that but mine has very little! I use the software on my computer to create my labels maybe that makes a difference?