Kat's Adventures in Paper Crafting...

Card Making, Stamping & Scrapbooking

  • Twitter
  • Facebook
  • Instagram
  • Pinterest
  • RSS

A Paper Crafting Blog

  • Home
  • About
    • About Kat
    • Contact Me
    • Disclosure
  • Organization
    • Updated & Easy Stamp Storage, Organization & Inventory!
    • Embellishment Storage Solution
    • Lazy Susan from Ikea for Gemini Jr Die Cutting Machine
    • Updated Die Storage Categories in Evernote
    • Cardstock Storage and Organization
    • Updated & Easy Stamp Storage, Organization & Inventory!
    • Stencil Storage
    • Organization Archives
      • Craft Room Tour
      • Bling & Enamel Dot Storage
      • Cardstock Storage – 8.5×11
      • Cardstock Storage – 12 x 12
      • Copic Marker Storage
        • Other Copic Storage Ideas
      • Die Cut Storage
      • Die Storage (Wafer Thin Dies)
      • Evernote Inventory
      • Flair Button Storage
      • Ikea Raskog Cart
      • Ink Pad Storage
        • My Ink Swatch Album
      • Peerless Watercolor Paint Storage Solution
      • Scrap Paper Storage
      • Sequin Storage
      • Small Stencil Storage
      • Stamp Storage System
      • Stickles Storage
  • Kat’s Favorite Crafty Products
    • Kat’s Favorite Adhesives
    • Kat’s Favorite Crafting Papers
    • Kat’s Favorite Coloring Mediums
    • Kat’s Favorite Crafting Tools
    • Kat’s Favorite Die Cutting Accessories
    • Kat’s Favorite Embossing & Foiling Products
    • Kat’s Favorite Inks Pads
    • ARCHIVED Kat’s Favorites – 2019
      • Kat’s Favorite Crafty Things – 2019
      • Kat’s Favorite Adhesives 2019
      • Kat’s Favorite Cardstocks & Paper – 2019
      • Kat’s Favorite Crafting Tools – 2019
      • Kat’s Favorite Die Cutting Products – 2019
      • Kat’s Favorite Heat Embossing Products – 2019
      • Kat’s Favorite Inks & Inking Tools & Products 2019
      • Kat’s Favorite Stamping Products – 2019
  • Paper Crafting
    • Tutorials & Guides
      • How to Unmount Your Rubber Stamps with EZMount Cling Foam
      • Evernote Tutorial
      • Stamping Tutorial for Beginners Part One: Rubber Stamps
      • Stamping Tutorial For Beginners Part Two: Clear Stamps
      • How to Clean Your Stamps & Stamp Cleaner Demonstration & Review
      • How to Create a Birthday Calendar Reminder Book
      • Create an Ink Swatch Album
      • Create Your First Scrapbook page
    • All Copic Posts
      • Copic Markers FAQ & Color Combinations for Beginners
      • Copic FAQ 2 – What Cardstock to Use with Copics
      • Copic FAQ 3 – What Ink To Use with Copics
      • Copic Marker Storage
    • Kat’s Project Shares
      • My Cards
      • My Scrapbooking Layouts
  • Evernote
    • Updated Die Storage Categories in Evernote
    • Original Evernote Tutorial
You are here: Home / Card Making / Peerless Watercolor Paint Storage Solution

Peerless Watercolor Paint Storage Solution

May 14, 2015 by Kat 1 Comment

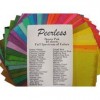
Hi guys, I recently purchased the Peerless Water Colors Bonus Pack which comes with 40 small squares of water color paint (on a small sheet of paint paper).  They look like this:

Peerless Watercolor Bonus Pack

I looked all over the web, youtube and pinterest looking for a suitable storage solution and finally came across one that Jennifer McGuire borrowed from a friend of hers and decided to give it a try myself.

Supplies Needed:

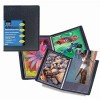
  • I used the Itoya 4×6 Profolio Booklet  but you can use any 4×6 photo album or booklet. I like the Itoya Profolio because it’s portable, bendy and easy to hold in my hand.  It’s also waterproof!  (Plus it was cheap $8.95 w/free shipping).
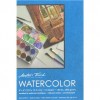
  • Watercolor Paper – I cut some kids watercolor sheets into 4×6 rectangles but you can buy them in that size already here.
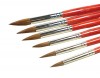
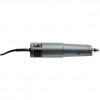
  • Paint Brushes – I used these but you can use any brushes you have.
  • Paper Trimmer – I used my trusty Cutterpillar Pro but again, you can use any paper trimmer you have.
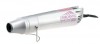
  • Heat Tool – This is optional, I used mine because I’m too impatient to wait for the paint to dry.
  • Craft mat – you will need this because this is quite the messy project.
  • Gloves – I didn’t use gloves but I regretted it because my fingers were all stained so you may want to use some disposable gloves.

Instructions:

First you are going to cut up your watercolor paper into 4×6 rectangles (unless you are using the 4×6 watercolor paper pad, then you can skip this step.

Be sure to keep your watercolor sheets in the exact order that they came in because they are NOT labeled and the only way you will know the color is if you keep them in order.  Also, be sure you are using the right side of the paper, I messed up at the beginning by gluing down the wrong side LOL

Using your Paint Brush and some water, touch the tip of your brush to the Peerless water color paper and pick up some color, then brush it on to the right side of the water color paper you’ve cut up.  You are creating a color sample for your book.  It should look like this:

Water color sample

Then you will slide the water color paper into one of the sleeves in your profolio.  It loads from the top.

Next, put some adhesive on the back of the peerless watercolor that matches your painted sample and adhere it to the front of the sleeve.  (Outside of the pocket).  It should look like this:

Peerless Water Color Sleeve

Voila!  You are finished!  Just do that for all of the color papers you received and when you are finished you will have a handy, dandy little booklet for your Peerless Water Colors!

Peerless Water Color Booklet

Here is a very short video tutorial showing how I made my water color booklet:

To watch in HD click here.

Video

InLinkz Project Manager account expired

InLinkz Project Manager account expired


« Previous article:

My Handmade Sewing Machine Cover!

Next Post: »

Two Cards Using Altenew’s Painted Flowers Stamp Set

Filed Under: Card Making, Scrapbooking Tagged With: how to store your peerless water colors, how to store your peerless watercolors, peerless water color, peerless water color storage, peerless watercolor, watercolor

Comments

  1. Jackie says

    May 15, 2015 at 7:16 am

    Thanks for the video. I have mine stored in a larger, homemade thingie, but I like this idea much better. I will have to do a little shopping.

    Reply

Leave a Reply Cancel reply

Your email address will not be published. Required fields are marked *

This site uses Akismet to reduce spam. Learn how your comment data is processed.

About Kat

Kat

Grab My Blog Button

Kat's Adventures in Paper Crafting
Copy and paste this code to add my button to your blog or website!
Kat Scrappiness - Stamping, Die Cutting, Crafting Store!

Categories

  • Art Journal
  • Awesome Scraprooms
  • Brother ScanNCut2
  • Card Making
  • Contests, Giveaways & Swaps
  • Copic Markers
  • Coupons
  • Craft Room Organization
  • Craft Shopping
  • Crafty Sales & Coupon Codes
  • DIY Projects
  • Download Free Scrapbooking Inventory Forms
  • Family Life
  • FOR SALE
  • Free Cut Files
  • Free fonts
  • Free Printables
  • Home Life
  • Justin's Recovery
  • Kat's Favorites
  • Kat's Life
  • Kat's Project Shares
  • Kat's Scrap Room Organization 2014
  • Kat's Scrap Room Pics
  • Kat's Scrap Room Video Tour
  • Kat's YouTube Videos
  • Mini Albums
  • My Cards
  • My Scrapbooking Layouts
  • News & Updates
  • Organization Products
  • Organization Projects
  • Organize It!
  • Other
  • Other Crafty Projects
  • Scrap Rooms & Organization
  • Scrapbooking
  • Scrapbooking Freebies
  • Scrapbooking Products & Reviews
  • Silhouette Cameo
  • Stamping
  • Teenagers
  • Tutorials & Guides

Recent Posts

  • I have a New Puppy!!!! April 23, 2025
  • Easter & Spring Craft Sale! February 15, 2025
  • Marker Destash! February 15, 2025
  • I’m still here! December 9, 2024
  • Merry Christmas and Happy New Year from Kat! December 23, 2023

Archived Posts

Copyright © 2025 · Delightful theme by Restored 316

Copyright © 2025 · Delightful Pro Theme on Genesis Framework · WordPress · Log in